
DOX - A Computer Scientists NoteBook
For full source visit github.
Software and Storage Setup
- In a cluster environment, shared storage** is critical. This allows all nodes to work on the same set of files simultaneously.
In a cluster having a central store that all nodes can access is a requirement.
With the release of the Raspberry Pi 5, small and fast M.2 physical storage is now available. So each node will have this to run and load the OS and workloads. There will be local backup onto SD Cards, but also recovery backups into the cloud.
Shares across the cluster will be two fold, using traditional NFS as well as Gluster, more about that later.
Slurm will be used to automate and orchestrate jobs across the cluster and OpenMPI will be used to manage the inter CPU communication between the Raspberry Pi's.
I will be building a Python and R demo to show case this working.
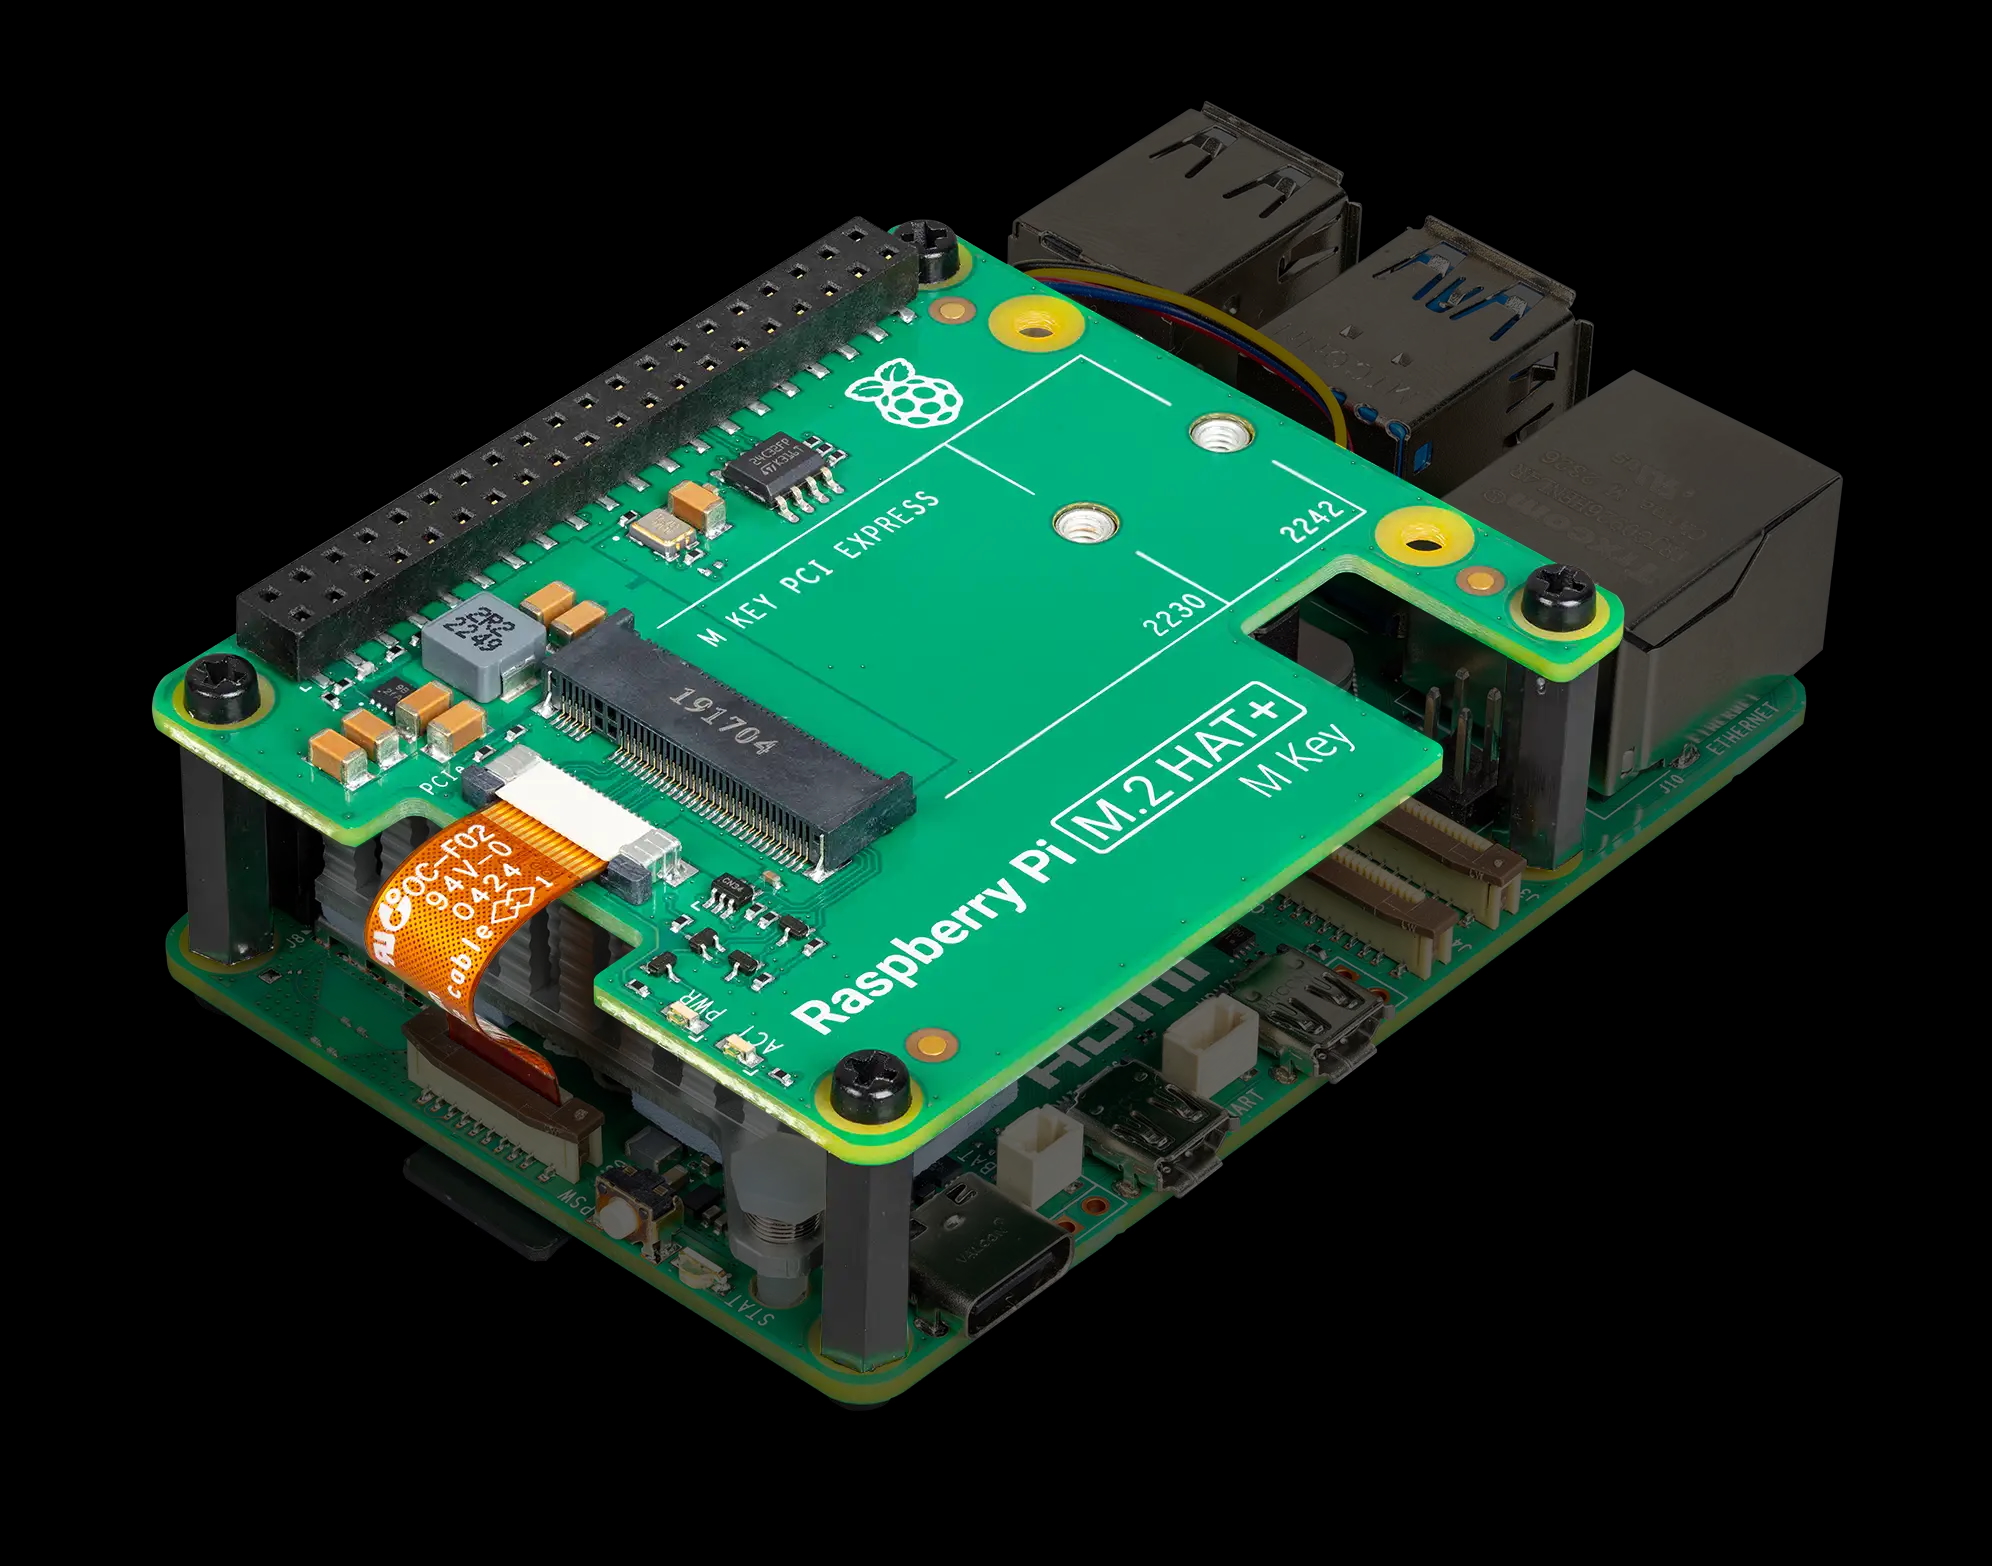
Setting up the M.2 HAT for RPi5
Booting Raspberry Pi 5 from an M.2 NVMe Drive Using a HAT
The Raspberry Pi 5 can significantly benefit from using an M.2 NVMe drive for faster read/write performance compared to traditional SD cards. By following this guide and using the provided scripts, you will be able to boot and run the Raspberry Pi OS and services from an M.2 NVMe drive connected via a compatible HAT.
This guide outlines the two-step process required to enable NVMe booting on the Raspberry Pi 5:
- Modifying the Raspberry Pi boot configuration and rebooting the system.
- Partitioning and cloning the existing SD card content to the M.2 NVMe drive post-reboot.
Prerequisites:
- A Raspberry Pi 5 with an M.2 NVMe HAT connected.
- An M.2 NVMe SSD properly inserted into the HAT.
- A microSD card with a working Raspberry Pi OS installation.
- SSH or console access to the Raspberry Pi.
- Basic knowledge of working with shell scripts.
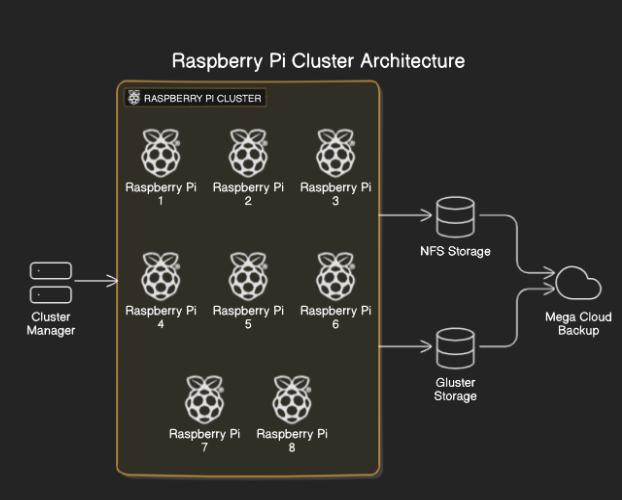
Storage Architecture
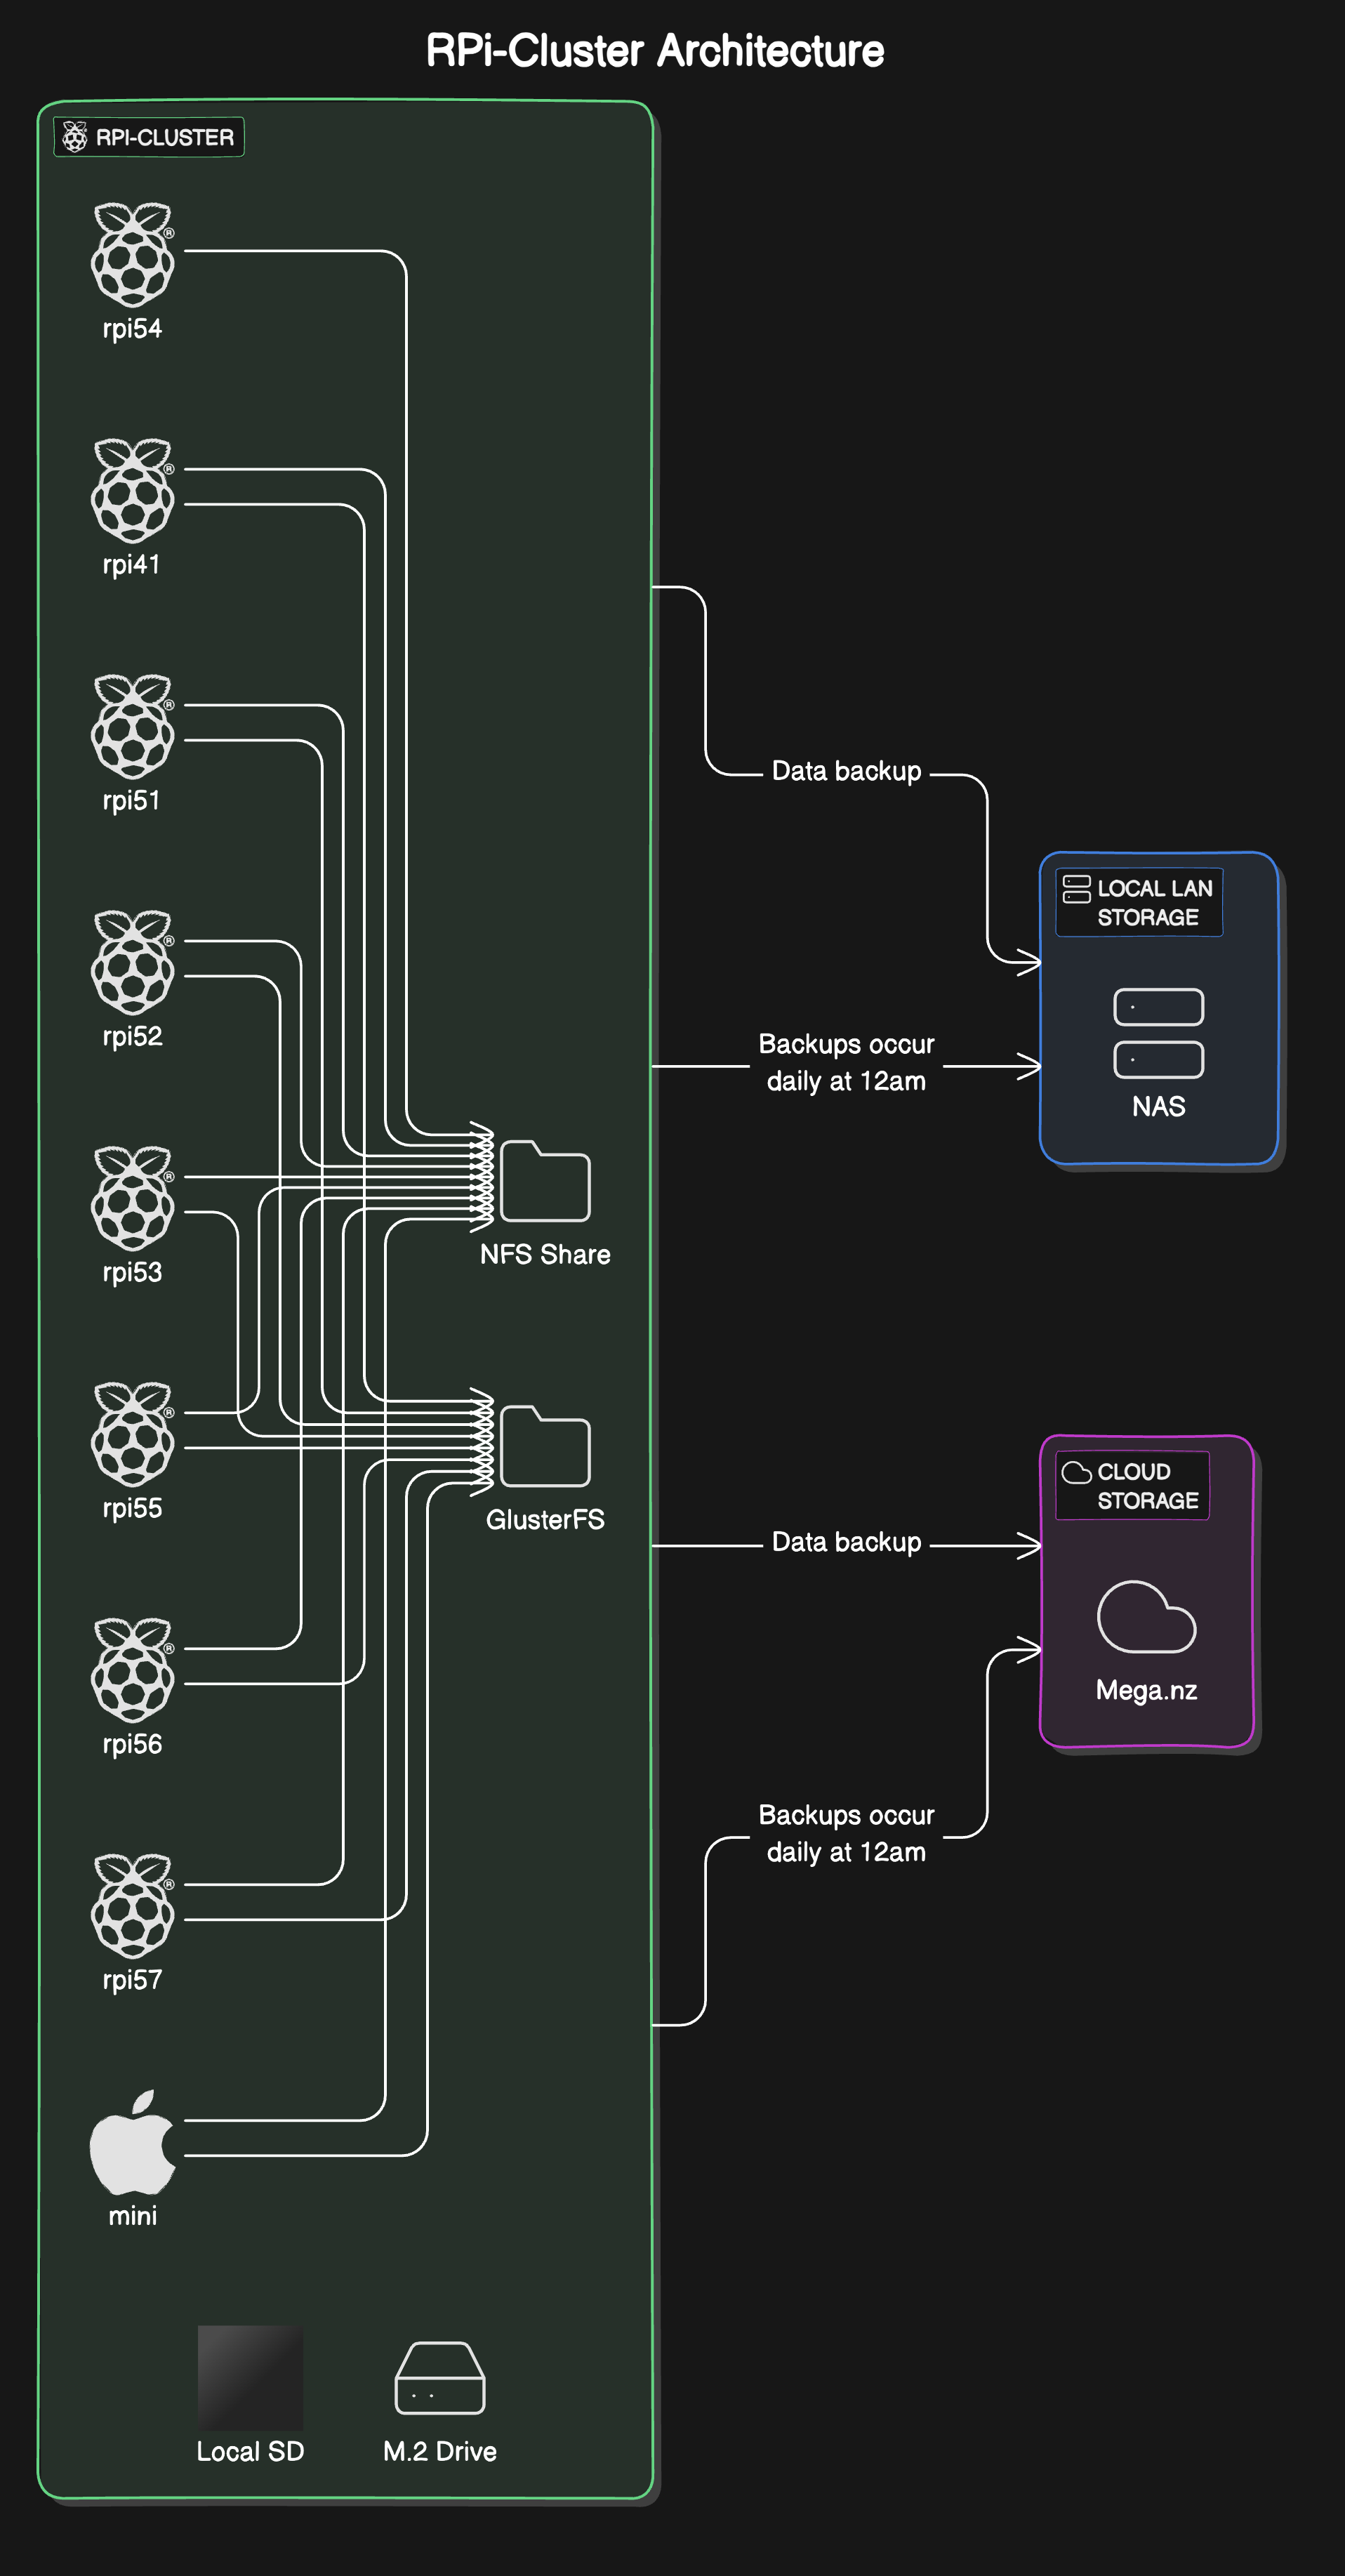
- Node Storage Architecture:
- Primary Boot: M.2 NVMe SSD
-
Backup Boot: 64GB Micro SD card (non-live, bootable if needed)
-
Distributed Storage Solutions:
- NFS (Network File System): Used for non-critical file distribution across the cluster
-
GlusterFS: Implemented for solution-dependent file access, providing scalable and reliable distributed storage
-
Backup Strategy:
- Local Backup: Data backed up to LAN-connected NAS
- Cloud Backup: Utilizes Mega.nz for off-site storage
-
Schedule: Daily backups at 12:00 AM for each node
-
Data Flow:
- Primary Operations: Conducted on M.2 NVMe SSDs
- File Sharing: NFS for general use, GlusterFS for specific solutions
-
Backup Process: Node data → Local NAS → Cloud Storage (Mega.nz)
-
Redundancy and Failover:
- Boot Redundancy: M.2 drive (primary) with Micro SD fallback
-
Storage Redundancy: Distributed across cluster (GlusterFS) and multiple backup locations
-
Performance Considerations:
- High-speed local storage with M.2 NVMe SSDs
-
Distributed file systems (NFS, GlusterFS) for balanced cluster-wide access
-
Scalability:
- GlusterFS allows for easy addition of new nodes to the storage pool
- NFS provides flexible shared storage expansion
This design ensures high performance, data redundancy, and scalable storage solutions across the RPi-Cluster, with comprehensive backup strategies for data protection.
Steps Overview:
Step 1: Pre-reboot Configuration Script
The first script modifies the Raspberry Pi’s boot configuration to enable support for the NVMe drive and updates the boot order to prioritize booting from the NVMe drive. It then reboots the system.
Key Tasks Performed by the Script:
1. Modifies /boot/firmware/config.txt to enable PCIe Gen 3 support for the M.2 NVMe drive.
2. Updates the boot order to prefer USB or NVMe boot.
3. Reboots the system.
#!/bin/bash
set -e

log() {
    echo "[$(date +'%Y-%m-%d %H:%M:%S')] $1"
}

check_command() {
    if [ $? -ne 0 ]; then
        log "Error: $1 failed"
        exit 1
    fi
}

if [[ $EUID -ne 0 ]]; then
   log "This script must be run as root"
   exit 1
fi

log "Updating config.txt"
cat << EOF >> /boot/firmware/config.txt
[all]
dtparam=nvme
dtparam=pciex1_gen=3
EOF
check_command "Updating config.txt"

log "Setting boot order to boot from USB/NVMe"
raspi-config nonint do_boot_order B2
check_command "Configuring boot order"

log "Rebooting system to apply changes"
reboot
This script updates the Raspberry Pi’s configuration to recognize the M.2 NVMe drive on the HAT and prioritizes booting from it. After reboot, the NVMe drive should be detected and initialized for further setup.
Step 2: Post-reboot Partitioning and Cloning Script
Once the system has rebooted with the updated configuration, the second script can be run. This script partitions the NVMe drive, marks the partition as bootable, and clones the entire content of the SD card onto the NVMe drive using the dd utility.
Key Tasks Performed by the Script:
1. Displays PCI devices and block devices to ensure the NVMe drive is recognized.
2. Creates a new bootable partition on the NVMe drive.
3. Clones the contents of the SD card onto the NVMe drive using dd.
4. Ensures data synchronization by running sync to write changes to the NVMe drive.
#!/bin/bash
set -e

log() {
    echo "[$(date +'%Y-%m-%d %H:%M:%S')] $1"
}

check_command() {
    if [ $? -ne 0 ]; then
        log "Error: $1 failed"
        exit 1
    fi
}

log "Displaying PCI devices"
lspci
check_command "lspci"

log "Displaying block devices"
lsblk
check_command "lsblk"

log "Creating a new partition on the NVMe drive"
fdisk /dev/nvme0n1 << EOF
n
p
1


a
1
w
EOF
check_command "Creating partition"

log "Cloning SD card to NVMe drive"
dd if=/dev/mmcblk0 of=/dev/nvme0n1 bs=4M status=progress
check_command "Cloning SD card"

log "Syncing data to NVMe"
sync

log "Creating a new data partition on the NVMe drive"
fdisk /dev/nvme0n1 << EOF
n
p
4


w
EOF
check_command "Creating data partition"

log "Creating ext4 filesystem on the new partition"
mkfs.ext4 /dev/nvme0n1p4
check_command "Creating ext4 filesystem"

log "Creating mount point directory"
mkdir -p /mnt/data
check_command "Creating mount point"

log "Mounting the new partition"
mount /dev/nvme0n1p4 /mnt/data
check_command "Mounting partition"

log "Displaying mounted partition information"
df -h | grep /mnt/data
check_command "Displaying partition info"

log "Getting UUID of the new partition"
blkid /dev/nvme0n1p4
check_command "Getting partition UUID"

log "Setting ownership and permissions for /mnt/data"
chown rpi:rpi /mnt/data
chmod 775 /mnt/data
check_command "Setting ownership and permissions"

log "Adding entry to /etc/fstab for automatic mounting"
UUID=$(blkid -s UUID -o value /dev/nvme0n1p4)
echo "UUID=$UUID /mnt/data ext4 defaults 0 2" >> /etc/fstab
check_command "Updating /etc/fstab"

log "Script completed successfully. Rebooting..."
reboot
This script partitions the NVMe drive and clones the content of the SD card. Once cloning is complete, you can boot the Raspberry Pi 5 from the M.2 NVMe drive.
Optional: Automating the Post-reboot Script
To automate the post-reboot partitioning and cloning process, you can configure a systemd service that runs the second script upon the next boot. This ensures that after the first reboot, the necessary steps to partition and clone the SD card to the NVMe drive are completed automatically.
Final Notes:
- Backup Data: Always back up critical data before running operations like
fdiskordd, as they are destructive and can result in data loss if misused. - Booting from NVMe: After following the steps, your Raspberry Pi 5 should be able to boot from the M.2 NVMe drive, providing faster storage for both the OS and any services you run.
- Performance: Using an NVMe drive significantly improves system performance, particularly for disk-heavy workloads such as databases or Docker containers.
- Troubleshooting: If the system doesn’t boot from the NVMe drive, ensure that the boot order is correctly configured, and verify that the NVMe drive is properly detected by the Raspberry Pi during boot.
By following this procedure, you can configure your Raspberry Pi 5 to boot from a high-performance M.2 NVMe drive, allowing you to run the operating system and critical services with improved speed and reliability.
DOX - A Computer Scientist's Notebook
Y0MG 1990-2024
GitHub Repository | Documentation Site